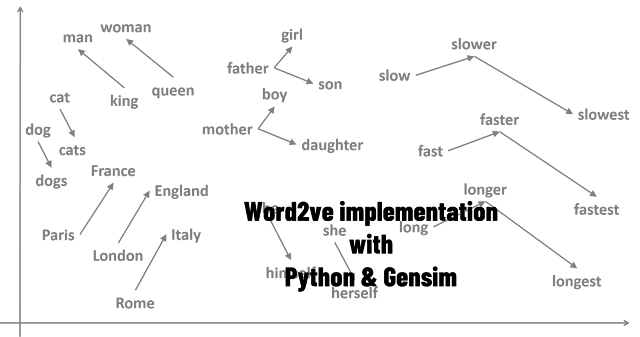
By using word embedding is used to convert/ map words to vectors of real numbers.
By using word embedding you can extract meaning of a word in a document, relation with other words of that document, semantic and syntactic similarity etc.
Word2vec is one of the popular techniques of word embedding. In my last few tutorials I have explained about different flavour of word2vec and how they work.
This tutorial I will show you gensim word2vec model implementation in python.
Must Read:
- Word2Vec Skip Gram explained
- Continuous Bag of Words (CBOW) – Single word model – How it works
- Continuous Bag of Words (CBOW) – Multi word model – How it works
Now let’s start gensim word2vec python implementation.
Install Packages
Now let’s install some packages to implement word2vec in gensim.
pip install gensim==3.8.3
pip install spacy==2.2.4
python -m spacy download en_core_web_sm
pip install matplotlib
pip install tqdm
Related Post: Python Virtual Environment Cheat Sheet
Now let’s import all required packages
Import packages to implement word2vec python
Let’s import all required packages for gensim word2vec implementation.
import json
import pandas as pd
from time import time
import re
from tqdm import tqdm

import spacy
nlp = spacy.load("en_core_web_sm", disable=['ner', 'parser']) # disabling Named Entity Recognition for speed

# To extract n-gram from text
from gensim.models.phrases import Phrases, Phraser
# To train word2vec
from gensim.models import Word2Vec
# To load pre trained word2vec
from gensim.models import KeyedVectors
# To read glove word embedding
from gensim.scripts.glove2word2vec import glove2word2vec

from sklearn.decomposition import PCA
import numpy as np
from sklearn.manifold import TSNE
import seaborn as sns
sns.set_style("darkgrid")
import matplotlib.pyplot as plt


# To find word frequency (Term frequency)
from collections import defaultdict
Download Data to implement word2vec gensim
For this tutorial I will be using yelp customer review dataset, find the link below to download it from kaggle.
This is a review dataset of various restaurants and their food and services. There are various columns in the dataset like: ‘user_id’, ‘business_id‘, ‘text‘, ‘date‘, ‘compliment_count‘.
Since we are only interested about building word2vec (word embeddings), so we for this tutorial I will only use ‘text’ colmn.
Data Pre-processing for gensim word2vec
Data preparation to implement word embedding using gensim word2vec can be vary problem to problem. In this tutorial I have tried to share standard data pre-processing which can be implemented in most word2ve gensim projects.
Let’s first read yelp review dataset and check if there is any missing value or not.
# Read yelp review tip dataset
yelp_df = pd.read_json("input_data/yelp_academic_dataset_tip.json", lines=True)

print('List of all columns')
print(list(yelp_df))

# Checking for missing values in our dataframe
# No there is no missing value
yelp_df.isnull().sum()
Step1: Lemmatizing, remove stopwords and Remove non-alphabetic characters
# lemmatizing,  removing the stopwords and Removing non-alphabetic characters

# Initializing regular expression
regex = re.compile('[^a-zA-Z]')

clean_txt = []
for row_num in tqdm(range(len(yelp_df))):
    txt_list = []
    doc = nlp(yelp_df['text'][row_num])
    for token in doc:
        if not token.is_stop:
            # Removes non-alphabetic characters from lemmatized word
            txt_list.append(regex.sub('', token.lemma_))
    if len(txt_list) > 0:
        clean_txt.append(' '.join(txt_list))
Step2: Remove duplicates and missing values
# Make a Dataframe
yelp_df_clean = pd.DataFrame({'clean': clean_txt})
# Remove duplicates and missing values
yelp_df_clean = yelp_df_clean.dropna().drop_duplicates()
yelp_df_clean.shape
Step3: Extract bigrams for gensim word2vec
# As Phrases() takes list of list as it's input
# Converting dataframe to list of list
sent = [row for row in yelp_df_clean['clean']]

# Tokenization of each sentance
token_sent = [doc.split(" ") for doc in sent]

# Configuring Phrases() for bigram
bigram = Phrases(token_sent, min_count=35, threshold=2,delimiter=b' ')

# Intializing Phrases() for bigram
bigram_phraser = Phraser(bigram)

# Extract bigrams for gensim word2vec
bigram_token = []
for sen in token_sent:
    bigram_token.append(bigram_phraser[sen])
At this point our data is ready for word2vec python implementation. Now let’s see top frequent word to check whether our cleaned data still have inflation or not.
# Count most frequent words
word_freq = defaultdict(int)
for sen in bigram_token:
    for i in sen:
        word_freq[i] += 1
len(word_freq)

# print most frequent words
sorted(word_freq, key=word_freq.get, reverse=True)[:10]
Train word2vec python
In this tutorial I will train skipgram model. You can also train CBW model by changing sg value to 0.
Also Read:
Let’s train gensim word2vec model with our own custom data as following:
# Train word2vec
yelp_model = Word2Vec(bigram_token, min_count=1,size= 300,workers=3, window =3, sg = 1)
Now let’s explore the hyper parameters used in this model.
min_count: Ignores all words with total frequency lower than this number. Default value for min_count is 5.
size: Dimensionality of the word vectors. Default value is 100.
workers: Number of threads to train the model (faster training with multicore machines).
window: Maximum distance between the current and predicted word within a sentence.
sg: Training algorithm: 1 for skip-gram; otherwise CBOW. So we are training skipgram model.
Save & Load Gensim word2vec model
It is good practice to save trained word2vec model so that we can load pre trained word2vec model later for later use and we can also update word2vec model.
# Save word2vec gensim model
yelp_model.save("output_data/word2vec_model_yelp")
# Load saved gensim word2vec model
trained_yelp_model = Word2Vec.load("output_data/word2vec_model_yelp")
Explore Gensim word2vec model
Now it’s time to explore word embedding of our trained gensim word2vec model.
# Check word embedding for a perticular word
trained_yelp_model.wv['food']
# Dimention must be 300
trained_yelp_model.wv['food'].shape
(300,)
# Check top 10 similar word for a given word by gensim word2vec
# trained_yelp_model.wv.most_similar('food')[:10]
trained_yelp_model.wv.most_similar('food', topn=10)
# Check top 10 similarity score between two word
trained_yelp_model.wv.similarity('beer', 'drink')
0.5015675
# Most opposite to a word
trained_yelp_model.wv.most_similar(negative=["food"], topn=10)
The similarity score you are getting for a particular word is calculated by taking cosine similarity between two specific words using their word vector (word embedding).
Note, If you check similarity between two identical words, the score will be 1 as the range of the cosine similarity is [-1 to 1] and sometimes can go between [0,1] depending on how it’s being computed.
Word2vec visualization tsne
It’s difficult to visualize word2vec (word embedding) directly as word embedding usually have more than 3 dimensions (in our case 300).
Now for word2vec visualization we need to reduce dimension by applying PCA (Principal Component Analysis) and T-SNE.
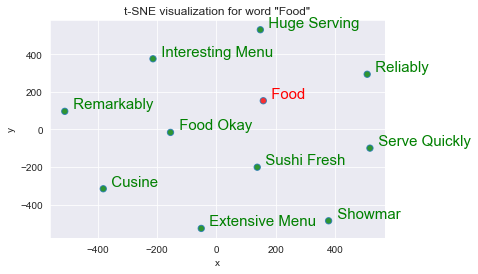
Following code is to visualise word2vec using tsne plot.
# tsne plot for below word
# for_word = 'food'
def tsne_plot(for_word, w2v_model):
    # trained word2vec model dimention
    dim_size = w2v_model.wv.vectors.shape[1]

    arrays = np.empty((0, dim_size), dtype='f')
    word_labels = [for_word]
    color_list  = ['red']

    # adds the vector of the query word
    arrays = np.append(arrays, w2v_model.wv.__getitem__([for_word]), axis=0)

    # gets list of most similar words
    sim_words = w2v_model.wv.most_similar(for_word, topn=10)

    # adds the vector for each of the closest words to the array
    for wrd_score in sim_words:
        wrd_vector = w2v_model.wv.__getitem__([wrd_score[0]])
        word_labels.append(wrd_score[0])
        color_list.append('green')
        arrays = np.append(arrays, wrd_vector, axis=0)

    #---------------------- Apply PCA and tsne to reduce dimention --------------

    # fit 2d PCA model to the similar word vectors
    model_pca = PCA(n_components = 10).fit_transform(arrays)

    # Finds 2d coordinates t-SNE
    np.set_printoptions(suppress=True)
    Y = TSNE(n_components=2, random_state=0, perplexity=15).fit_transform(model_pca)

    # Sets everything up to plot
    df_plot = pd.DataFrame({'x': [x for x in Y[:, 0]],
                       'y': [y for y in Y[:, 1]],
                       'words_name': word_labels,
                       'words_color': color_list})

    #------------------------- tsne plot Python -----------------------------------

    # plot dots with color and position
    plot_dot = sns.regplot(data=df_plot,
                     x="x",
                     y="y",
                     fit_reg=False,
                     marker="o",
                     scatter_kws={'s': 40,
                                  'facecolors': df_plot['words_color']
                                 }
                    )

    # Adds annotations with color one by one with a loop
    for line in range(0, df_plot.shape[0]):
         plot_dot.text(df_plot["x"][line],
                 df_plot['y'][line],
                 '  ' + df_plot["words_name"][line].title(),
                 horizontalalignment='left',
                 verticalalignment='bottom', size='medium',
                 color=df_plot['words_color'][line],
                 weight='normal'
                ).set_size(15)


    plt.xlim(Y[:, 0].min()-50, Y[:, 0].max()+50)
    plt.ylim(Y[:, 1].min()-50, Y[:, 1].max()+50)

    plt.title('t-SNE visualization for word "{}'.format(for_word.title()) +'"')
# tsne plot for top 10 similar word to 'food'
tsne_plot(for_word='food', w2v_model=trained_yelp_model)
 |
| T-SNE plot for custom word2vec model |
Update pre-trained gensim word2vec model
As you have trained and saved you custom word2vec model. You can always load and update this saved model with new data set.
You can also update any pre-trained word embedding (explained below) like google pre-trained word2vec or glove pre-trained model etc.
new_data = [['yes', 'this', 'is', 'the', 'word2vec', 'model'],[ 'if',"you","have","think","about","it"]]

# Update trained gensim word2vec model
trained_yelp_model.build_vocab(new_data, update = True)

# Update word2vec gensim model using new data
new_model = trained_yelp_model.train(new_data, total_examples=trained_yelp_model.corpus_count, epochs=trained_yelp_model.iter)
Working with Pre-trained word embeddings python
Pre-trained models are most simple way to start working with word embeddings. The advantage pre-trained word embeddings is that they can leverage massive amount of datasets that you may not have access to, built using billions of different unique words.
Pre trained models are also available in different languages; it may help you to build multi-lingual applications.
You can further update pre-trained word2vec model using your own custom data.
Now let’s work with some popular pre-trained embeddings in Python gensim.
Google Pre trained word2vec
You can download Google pretrained word2vec model by below link:
After downloading Google pre-trained word embedding you need to extract it into a folder, and then follow below code.
Note, dimension of google pre-trained word2vec is 300.
# https://drive.google.com/file/d/0B7XkCwpI5KDYNlNUTTlSS21pQmM/edit
# Load Google Pre trained word2vec model
pretrained_google_news_model = KeyedVectors.load_word2vec_format('input_data/GoogleNews-vectors-negative300.bin', binary=True)

# Access vectors for specific words with a keyed lookup:
vector = pretrained_google_news_model['food']
# see the shape of the vector (300,)
vector.shape
(300,)
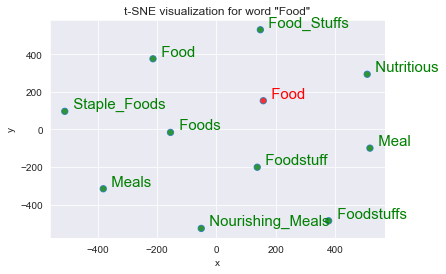
# tsne plot for top 10 similar word to 'food'
tsne_plot(for_word='food', w2v_model=pretrained_google_news_model)
Glove pre-trained model
GloVe (developed by Stanford research team) is an unsupervised learning algorithm for obtaining vector representations for words (word vector).
You just need to download glove pretrained model by below link and flow below code to work with glove pre trained model.
# https://nlp.stanford.edu/projects/glove/
# Convert and save glove word embedding to gensim format
glove2word2vec(glove_input_file="input_data/glove.6B.300d.txt", word2vec_output_file="output_data/gensim_glove_vectors.txt")

# Read saved gensim glove word embedding
glove_model = KeyedVectors.load_word2vec_format("output_data/gensim_glove_vectors.txt", binary=False)

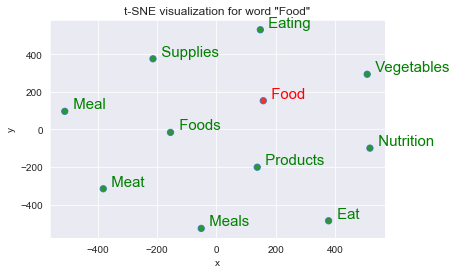
# tsne plot for top 10 similar word to 'food'
tsne_plot(for_word='food', w2v_model=glove_model)
Spacy pre-trained word embedding
Python library spacy also have pretrained word embeddings. You can use space pre-trained word embedding by downloading them using below command.
Note, I am sharing command to download English language pre trained word vector model, though spacy supports and provide multiple language word embedding.
For Small word embedding (I am using in this tutorial)
python -m spacy download en_core_web_sm
Medium size spacy word embedding
python -m spacy download en_core_web_md
Large size spacy word embedding
python -m spacy download en_core_web_lg
# process a sentence using the pretrained model
doc = nlp("This is a sample text to check spacy word embeddings")
for token in doc:
    print(token.i, token)

# Get the vector for word 'text':
doc[4].vector
Explore word2vec Online
If you just want to explore word2vec online visit blow link. This bionlp portal helps you to explore four different word2vec models.
You can check Similarity between two words and word analogy.
Conclusion
In this tutorial you learned:
- Implement of word2vec python
- Data Pre-processing for word2vec gensim
- Train word2vec python
- Save trained gensim word2vec model
- Load saved gensim word2vec model
- Gensim word2vec visualization tsne
- Update pre-trained word2vec gensim model
- Working with Google Pre trained word2vec gensim
- Gensim Glove pre-trained model
- Working with Spacy pre-trained word embedding
If you have any question or suggestion regarding this topic see you in comment section. I will try my best to answer.


